Getting started out in sculpture can be difficult because there is just not a lot of information out there. I had one sculpture class in college, and learned some tricks, but It wasn't enough to go on my own. So over the course of a few years I scoured the internet and emailed pros, just looking for a good work flow. After many failed experiments I think Ive got something that works for me. All it is is the bits and pieces Ive put together from other sculpture tutorials and info from forum members.
The character I will be doing is a commission from Jayenti Collins.
Here is a link to his work:
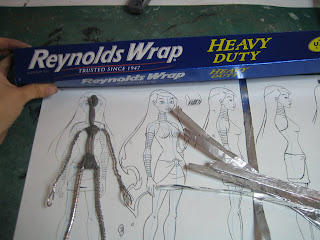
To begin with, you should obviously start with a concept, When I'm doing a commission I generally ask for a 2 or 4 point turnaround at the size the sculpt will be, and then a drawing of the pose. I will draw a line down the center of each mass to indicate where the armature will go.
I generally use three different size wires, The biggest wire I use is about a 1/8 inch. You can get these at your local hardware store.
After I have the wires Ill start making the armature, this is the skeleton. The biggest wire Is the one that I from the heel to the legs. I trace along the line I drew down the center of the drawing. The wire extends beyond the foot, remember to do this so that you have something to stick into the base later on. I'll make 2 of these, one for each side of the body.
I use a 2 part epoxy putty called Fast Steel. to connect the 2 wires at the waist Or you can just use the small gauge wire and wrap them together.
Now I take the smallest wire I have and wrap it around the legs like the picture below. I do this to strengthen the wire, also the aluminium foil that you wrap around it later on will stick much better.
I move on to the arms. I take the middle size wire and trace up one arm, wrap around the spine and then down the other arm. Keep in mind it's much better to have the wire too long than too short.
Ok, now I connect the wires at the spine with the fast steel. I also wrap the small wire around the arms like I did for the legs.
In order to bulk this up, I wrap aluminium foil all around the armature. I do this so that less Super Sculpey is used and the sculpture will bake properly. I like to fold the foil into little strips so that they wrap more tightly around the wires.
I try to wrap the foil around as tightly as I can. I use a glue gun to glue the foil to the wire and to itself. You can use any glue though.
This parts boring... I just keep wrapping it up until I've built up those forms. The goal is to get it to a point where all the parts of the figure will need the same amount of clay.
I use the picture of the character in the pose to find where the feet will connect to the base.
Drill the holes in the base.
Instead of using one or the other, I like to mix firm and normal sculpey.
I use a pasta strainer to mix it, (because I am weak) but you can just use your hands. I also like to mix in some colored Super Sculpey clay sometimes.
Now, when I start putting that clay on the sculpt. I make sure to put thin little strips on at a time. At least for the first layer anyway. It helps the clay stick to the aluminum a bit better. Someone once told me if i didn't do that, air would get trapped, and that makes it explode in the oven.... or something . I don't know if its true, but Id rather not take my chances.


Air's bubbles can explode a terracotta figure but sculpey has more plasticity. I'm unaware of something like that could happens (never happened to me).
ReplyDeleteNice tutorial Irene!
Great info Irene!
ReplyDeletethis is awesome! Please keep it coming!
ReplyDeleteIrene me encanta tu trabajo. Un saludo desde España.
ReplyDeletegreat tutorial. I love the idea of using renoyld's wrap. i am teaching a sculpture class to kids,and this is a great Idea. I'm not a sculptor, so this really helps. thanks!
ReplyDeleteGreat information!!! I'm just beginning to learn about clay and sculpting and this is exactly what I needed! Thanks for such clear info and great pics.
ReplyDeleteAwesome tutorial.....thank u....this is very helpful for beginners like me .
ReplyDeleteAir bubbles dont matter in sculpey. They were thinning of clays that are fired in kilns.
ReplyDeleteExcellent, very educational, thanks!!
ReplyDeleteMe encantó desde Barranquilla quisiera saber como traducir no se ese idioma gracias
ReplyDeletePlease tell me how you join the armature to the base. I see that you drilled a hole in the base, but what do you do after that to attach it? Thank you for any information. I can't seem to find how to do this anywhere. If you need it, my email now is kelseyrose1993@yahoo.com
ReplyDeleteAgain, thank you
Tana